Qtime – User Guide
Table of Contents
1. About Timesheet Application
1. About Timesheet Application
Timesheet app in zoho creator is an application which is used to track the time spent on projects or tasks. A timesheet is a data table which an employer can use to track the time a particular employee has worked during a certain period. Businesses use timesheets to record time spent on tasks, projects, or clients. Any company or organization must accurately account for the time its workers spend on tasks and projects. Time entry involves employees entering the time they start and end work on a task or project on a timesheet. This data is then used in client billing as well as payroll processing. Using the timesheet app has several benefits like labour management, simplified payroll process, client invoicing, team accountability, and efficient use of employee’s time for projects and tasks.
1.1 Working
This app is designed with a number of separate modules which interact with each other. There are mainly two types of logins are in this application.
1.Admin
2.Employee
Admin can login as an application user, admin have the power to add employees, add projects, assign projects to employees etc
Employee can login to this application as customer portal user, The employee can login to the system with his/her credentials an choose the month and update timesheet entry.
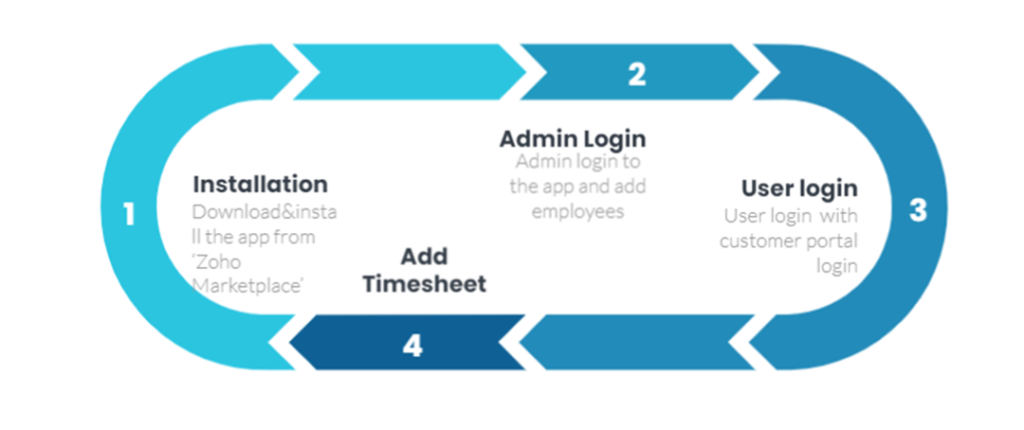
Fig 1.1: Overall Working
2. Admin
Admin plays the master role in this application. Admin can login as an application user. Overall management of the application is done by admin.
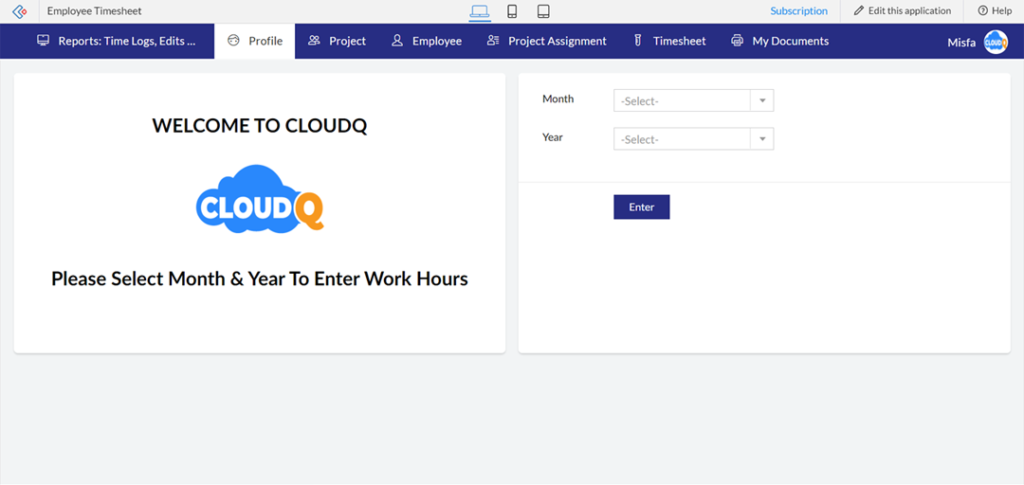
Fig 2.1: Admin Landing Page
Admin module contains a no: of sub modules they are,
- Project
- Employee
- Project Assignment
- Timesheet
- My Documents
- Quick Find.
2.1 Project
Admin can add the projects by submitting the project code and project name.
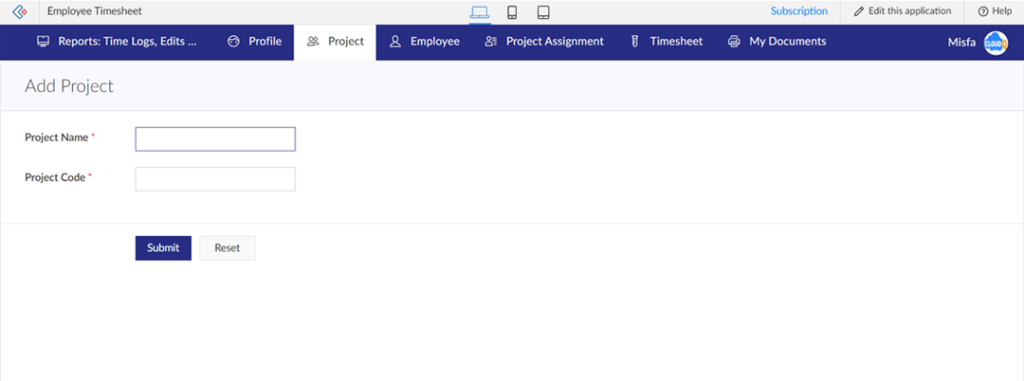
Fig 2.2: Add Project Form.
2.2 Employee
Admin can add employees in to the system by submitting of add employee form. The form consists of necessary details about the employee like email, phone, Address etc.
Admin can also add “Reporting Manager”, Reporting Manager is like department head. Admin assign a reporting manager to each employee when registering the employee to the system.
Whenever a new employee is added to the system, application will automatically create a new user login in the customer portal.
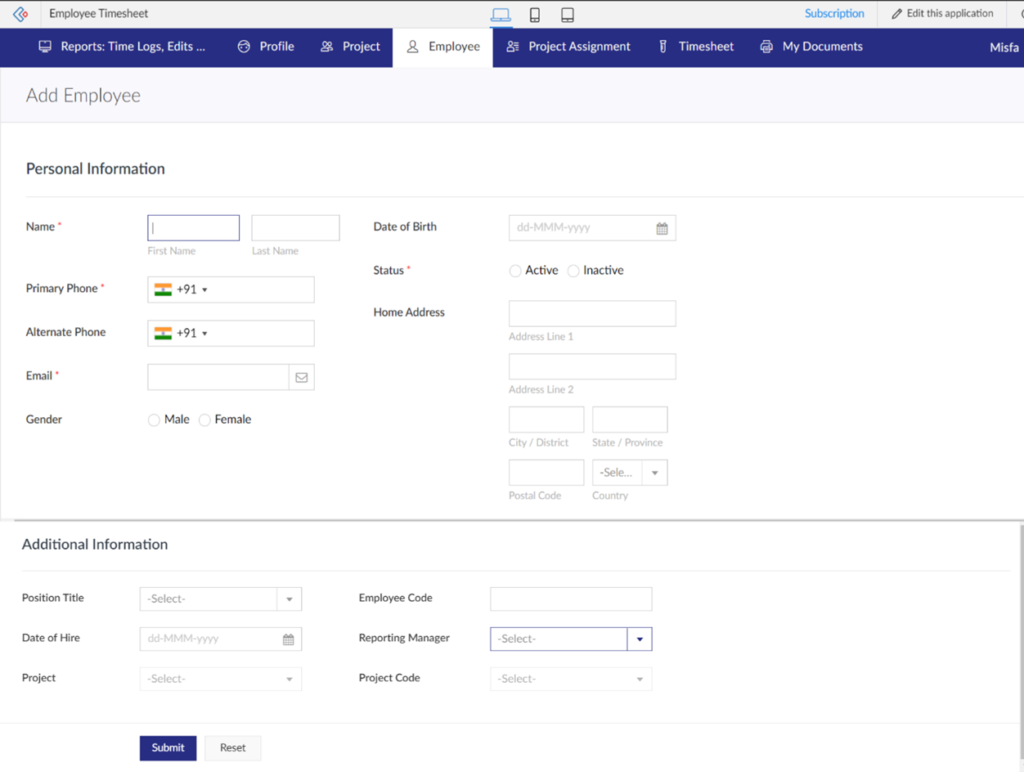
Fig 2.3: Add Employee Form
2.3 Project Assignment
Admin is responsible for assigning projects to the employee. Admin can choose the employee or employees, select the project code and provide the starting and ending data, by submitting this form will assign that project to employee.
All the employees they have no active project assigned is listed in the employee field in the “Assign Project” Form.
In Assign Project form when we choose a project code, it will automatically fetch the project name.
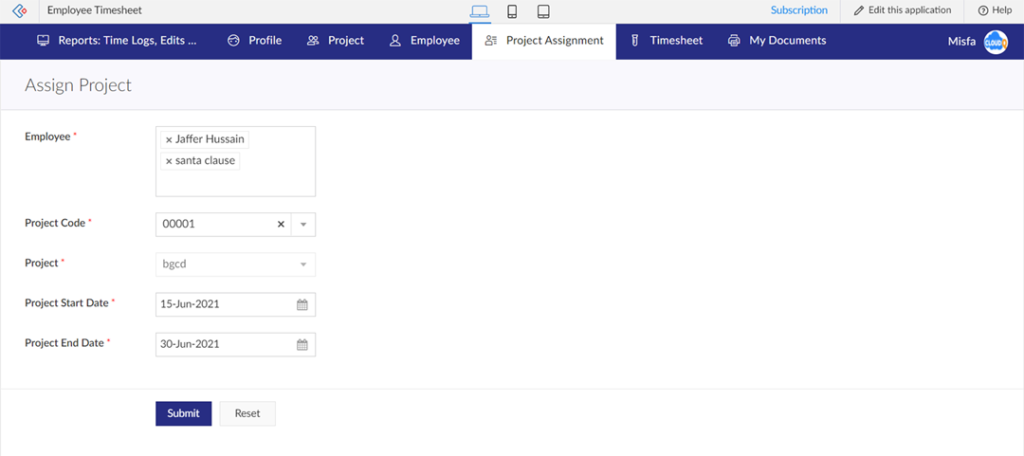
Fig 2.4: Assign Project Form
2.4 Timesheet
In this application, the admin doesn’t have the option to do timesheet entry only the employees (portal users) can make they’re timesheet entry. Admin can view all the employee’s timesheet data and can be exported it into different formats like pdf, csv, xl etc.
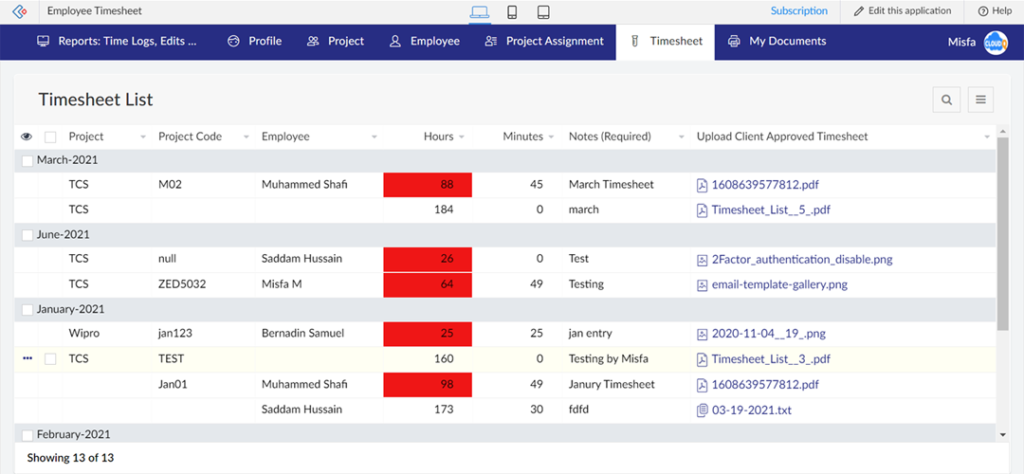
Fig 2.5: Timesheet List Report
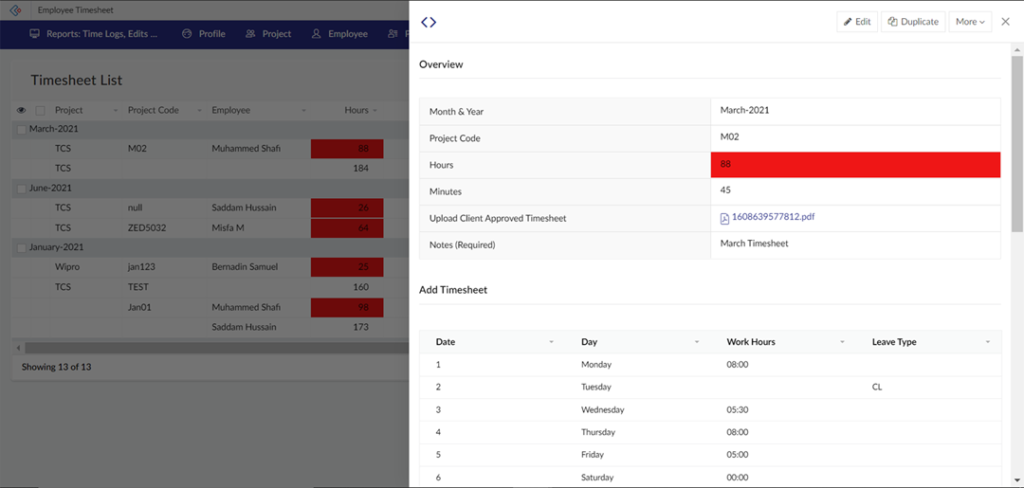
Fig 2.6: Timesheet List Report (Detail View)
2.5 My Document
‘My Document’ module helps the admin to send the documents to the employees. There may be chance to send documents like payslip, or any reports to employees, admin can simply select the employee, select the type of document and enter the document title, by submitting the form the employee can get a copy of the document in they’re profile.
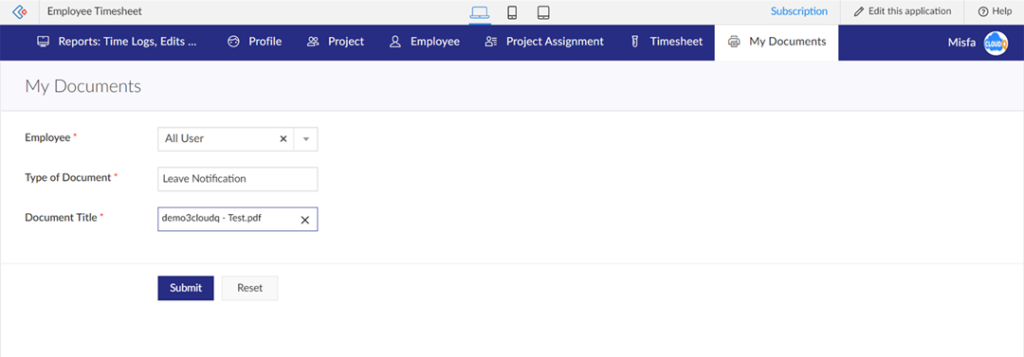
Fig 2.7: My Document Form
2.6 Time Log by User & Month
Admin have a feature to search the timesheet entry of a user by simply selecting the employee’s name, month and year, it will list the employee timesheet entry based on the entered month and year.
If the admin needs to search all the employee’s data, then admin can select ‘All User’ instead of a single employee.
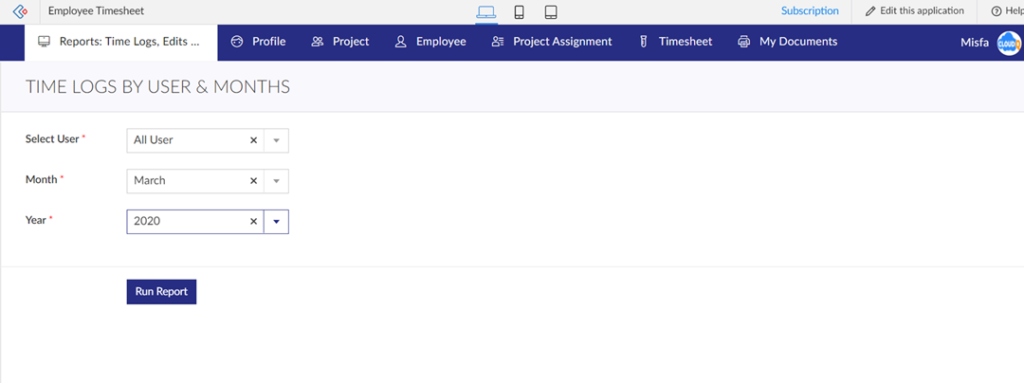
Fig 2.8: Search Form
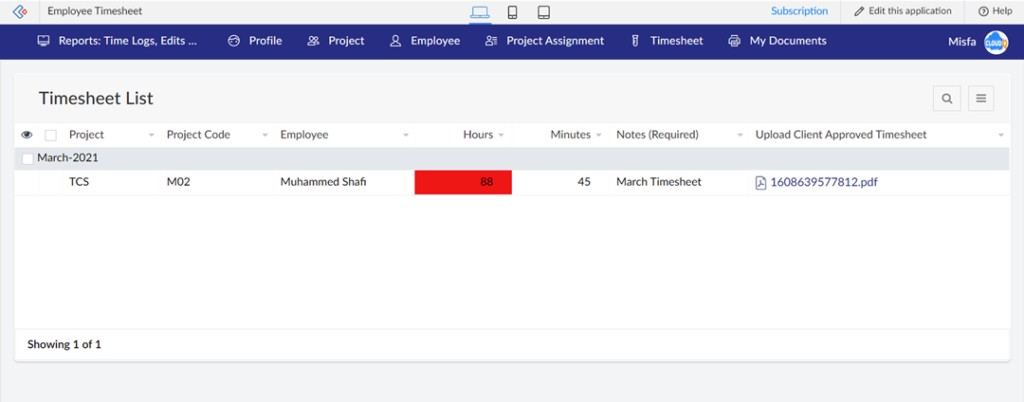
Fig 2.9: Search Result
3. Employee
The second role in this application is ‘employee’. Employees can login to the system as portal user with the credentials. He/she can login to the application and choose the month and year want to enter the timesheet data and submit that form to make the timesheet entry.
Whenever the admin creates an employee a customer portal login to that particular employee is also created, an email is shared to them to setup an account in customer portal.
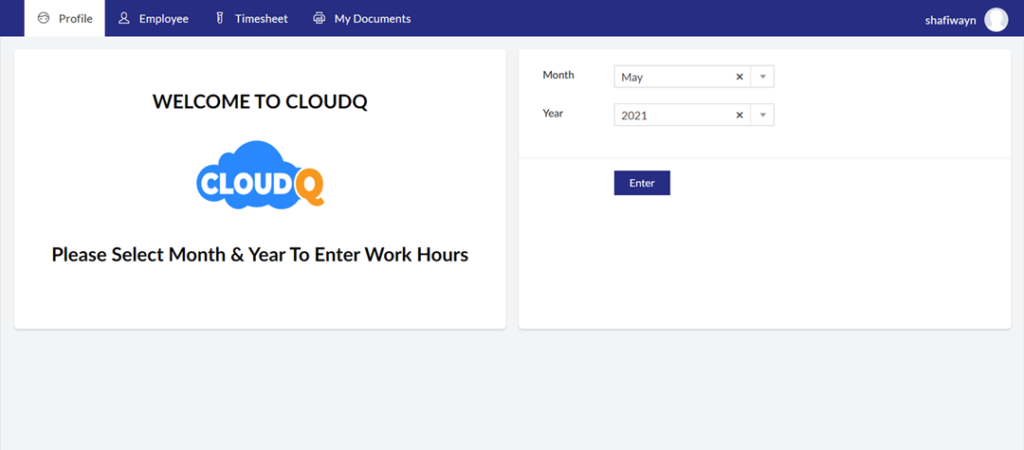
Fig 3.1: Employee Landing Page
Employee login contains a no: of sub modules, they are
- Profile
- Employee
- Timesheet
- My Document
3.1 Profile
Employee can go to the profile module, select the month and year to submit the timesheet data, by clicking the submit button a form is loaded with project information assigned to the employee. Employee can add daily timesheet data in hours and whether the employee is in leave mark it as leave.
Total working hours will be calculate based on the user input the work hours.
The user can mention a day as leave as by choosing the leave type, there are currently 4 types of leaves
SL – Sick Leave
CL – Casual Leave
EL – Emergency Leave
OFH – Official Holiday
OPH – Optional Holiday
Validations
There are some kinds of validations are done in the profile module
- The employee can’t submit timesheet for a future date.
- The employee can’t submit timesheet data for a previous month, only exceptional case is if the date is less than 5 then employee can add timesheet for it’s one previous month.
- The maximum working hour an employee can add is limited to 10 hrs/day.
- The minimum working hour an employee can add is limited to 4 hr/day.
- If a day is marked as leave, no timesheet can be made on that day.
- If the employee is submitted the timesheet as incomplete, he/she can come back and update if the current date is less than 5.
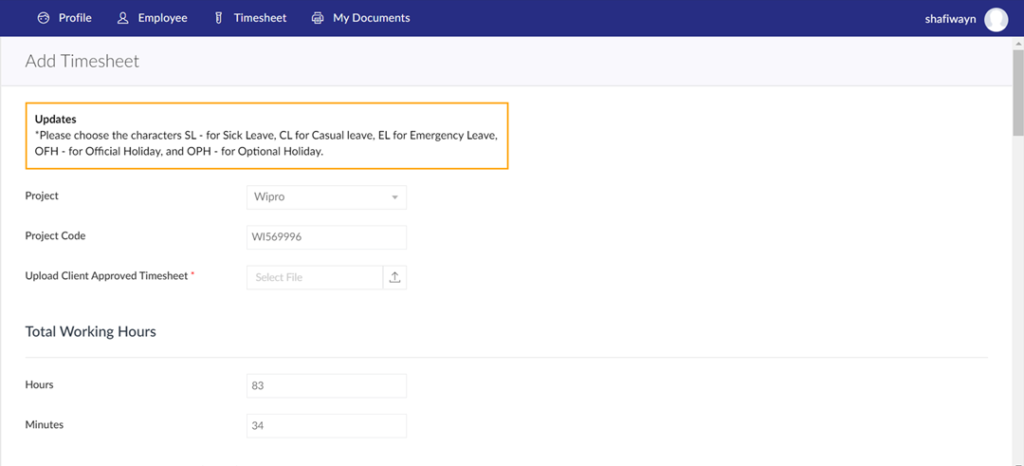
Fig 3.2: Add Timesheet Form
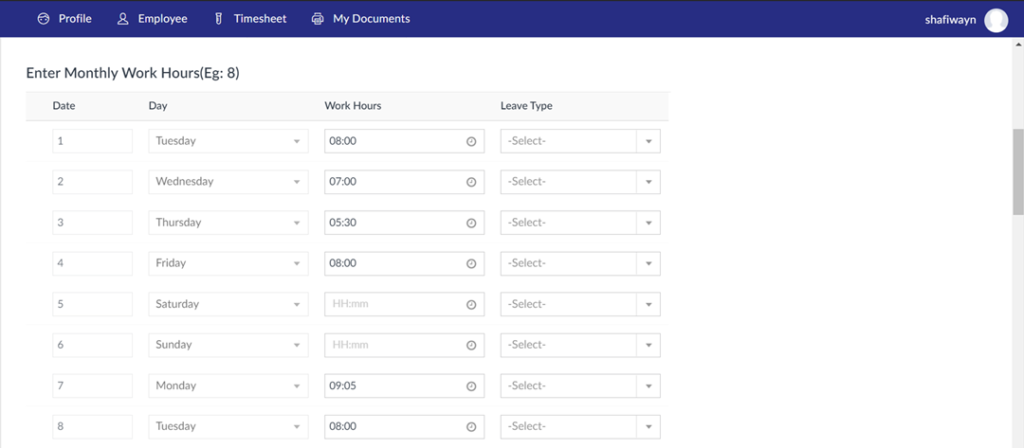
Fig 3.3: Add Timesheet Form
3.2 Employee Profile
This module consists of all the information regarding the particular employee. Employee can view they’re profile information but employee can’t edit the information except the phone number and address. Phone number and address can be edit by employee itself, all other information can be updated only by the admin.
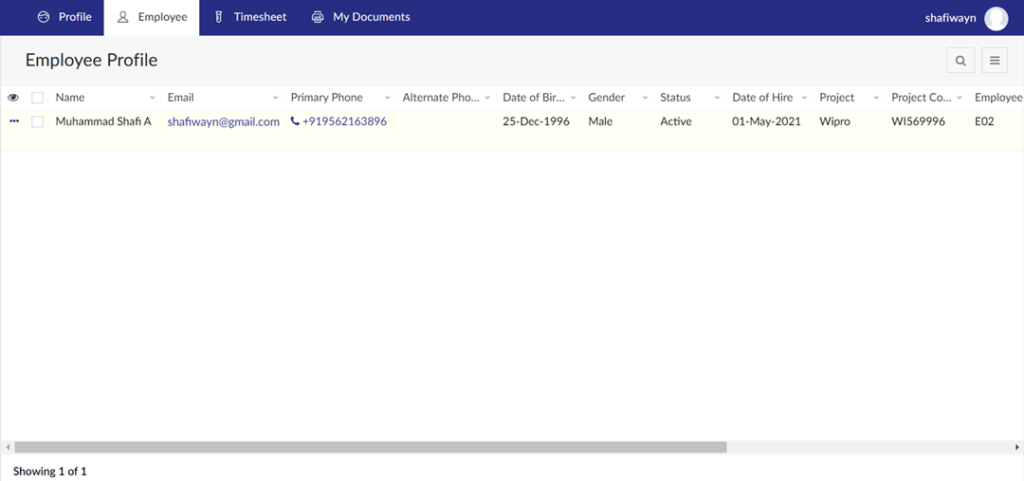
Fig 3.4: Employee Profile.
3.3 Timesheet Report
This module consists of all the timesheet data that the employee added so far. All the previous month data will be listed here. Employee can also edit the details entered, if the report month is current month or if the month is immediate previous month and current date is less than 5.
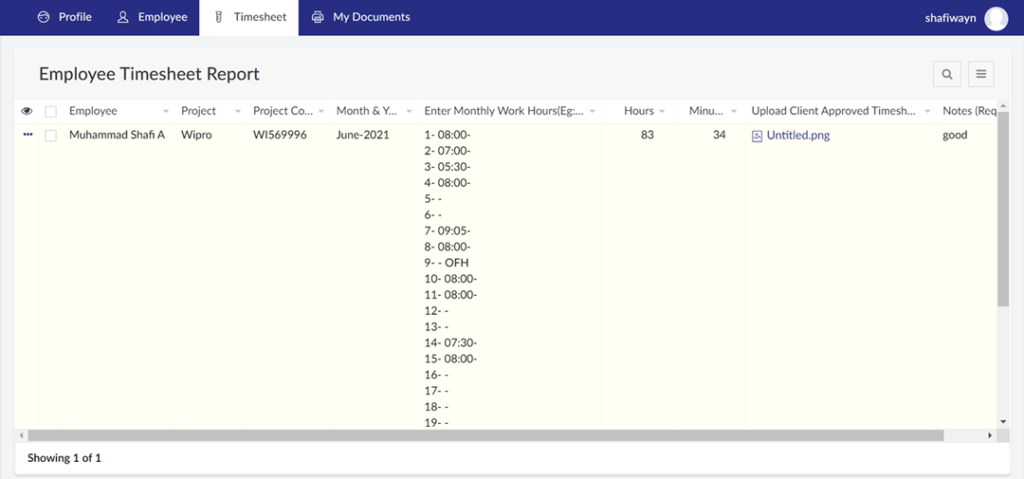
Fig 3.5: Employee Timesheet Report.
3.4 My Documents
This module will contain the documents that is send by the admin. Documents may be pay slip, notifications, or any other documents from management side. All the documents shared with so far will be listed in ‘My Document’ module.

4. Technical Support
If you have questions, issues, or concerns, please do not hesitate to contact our support team.
Via email:
Address:
CloudQ
2nd Floor Nila Building,
Phase-1, Technopark, Kazhakkoottam,
Thiruvananthapuram, Kerala – 695581.